HOWTO Lesson 2 :
Creating .DLL's
(NOTE : This
lesson assumes that you've already read and understood Lesson 1)
Copyrightę 2001-2002 by Kevin Wilson
This page outlines the steps to take to create a "Dynamic Link Library" or "DLL" and explains the concepts behind each step.
The main purpose of a Dynamic Link Library, or "DLL" as they are more commonly known as, is to provide modular and/or portable functionality. Simply put, DLLs have three purposes:
- Package Up Misc Files
- Provide Portable Routines
- Provide
Packaged Functionality
Package Up Misc Files:
Many developers choose to use DLL files as resource files to package up such files as ICONs, BITMAPs, WAVE files, MIDI files, or other MISC files for use by their main application. Doing so reduces the size of the main program because it doesn't have to store these files within the EXE file. It also "hides" the files from the user so that you don't have to flood the program's installation directory with 50 sound files, giving the user direct access to change, move, or delete them. Putting them in a compiled DLL restricts their use to those who know how to use them (programmers).
I'll discuss this topic more in Lesson 4 "Creating .RES's" (which are resource files).
Provide Portable Routines:
The second kind of DLL is a DLL that is built as generic as is possible. The reason for this is that by being generic, multiple applications can make use of the same DLL at the same time - thus saving them the trouble of re-writing code that is already available.
For example, if I wanted to make a program that played sounds while it was running (like a game), I could do one of two things:
1) Dig DEEP into the MSDN documentation and find out how Windows interfaces with the computer's hardware and hardware drivers, and figure out how to use complex API calls to make the computer's sound card make sounds and play sound files,
- or -
2) I could simply call a couple of simple, pre-built functions within the WINMM.DLL (a very popular multimedia DLL that comes with Windows) or the DX7VB.DLL (a DLL developed to wrap the functionality of DirectX so it's easy to use with VB). These DLLs already have sound playback functionality built into them... and they'd probably do a lot better job of it than I would starting from scratch because they've been around for many years and have been improved, and revised over and over until they are stable and powerful.
Obviously choice number 2 is the wiser choice because it would most likely work better and would save you hours, even DAYS of researching to "re-invent the wheel".
DLL's like these are designed to be used simultaneously by multiple programs at the same time. "HOW DOES IT DO THAT" you ask? Simple... each time an application makes a call to a DLL, a copy of that DLL is loaded into memory to be used by that application. When that application is finished with it or is shut down, the copy of the DLL that was sitting in memory is unloaded. Multiple copies of the DLL can be running at the same time and they won't interfere with each other. I'll explain more about this in a second.
Provide Packaged Functionality:
The third type of DLL is one that is NOT meant to be used by multiple programs, but rather is meant to be used only by one application. What I mean is, if you wanted to create a program that had several different things going at once, or wanted to break out different pieces of your program to be handled separately, you could do so by taking that functionality and putting it into a DLL, and calling the DLL to do the work away from your main application. This way, you could have your main application doing task A, while you have a couple of DLLs working on tasks B, C, & D for you. This is called multi-tasking and is possible by the use of DLLs, or by the use of Multi-threading within your application (which is a nightmare to deal with).
One REALLY good example of this is a DLL that is used extensively by vbAccelerator.com. vbAccelerator.com does a lot of "Sub-classing" (which is when you take over some of the functionality that is normally handled by Windows - like the drawing of a window onto the screen so the user can see it, or drawing menus when a user clicks on an application's menu system). Sub-classing can be a very powerful, yet very dangerous thing because if you don't handle the Windows events just right, you will cause Windows exceptions and memory access violations (A.K.A. - THE BLUE SCREEN OF DEATH). One other big problem with sub-classing within Visual Basic is that when you call a sub-classing routine within your code and then try to debug it within the Visual Basic Integrated Development Environment (VB IDE), you CAN NOT do it correctly! VB doesn't handle sub-classing well within it's debugging environment and that makes it impossible some times to properly step through code and edit code in debug mode.
To avoid these problems, vbAccelerator has come up with a DLL that handles the sub-classing for you called "SSubTmer.dll". If you ever download any of the controls or code on that site, you'll most likely have to download and install this DLL as well, because it handles the sub-classing. This way, the problematic piece of an application is pawned off to a DLL to handle off on it's own, while the main program happily goes about it's business doing more important things.
Like I said earlier, when a DLL is called by an application, that DLL is loaded into memory to be used by that application. To more specific... the called DLL is loaded into the calling application's memory space. This way, it alone has the ability to call that copy of the DLL. Therefore, you don't run into problems with multiple applications calling the same DLL at the same time and causing access problems.
There are two types or styles of DLLs that are most often used by programmers. They are:
- Win32 API / C / C++ Style DLLs
- ActiveX / COM
/ VB Style DLLs
Win32 API / C / C++ Style DLLs:
The way that this style of DLL works is functions are declared within the DLL as being "EXPORTED", which means that they can be called from without the DLL itself. The way this is done is when you declare the function within the DLL, you include special key words that the compiler understands and interprets to mean that that function should be made available to external programs.
All Windows API calls are done this way. The majority of the API calls made to Windows are stored within the KERNEL32.DLL, USER32.DLL, or GDI32.DLL files. In order to make a call to a function within one of these DLLs from Visual Basic, you have to declare to VB what function you're calling, where the function is located, and what parameters (along with parameter data types) are to be passed back and forth - like this:
'
Sets the last error number |
The "Declare" key word tells VB that this line of code is going to tell it where the named routine is and how to use it. The "Sub" key word indicates that the specified routine has no return value. On the other hand, if it did you'd replace "Sub" with "Function". The word that follows "Sub" or "Function" is the name of the routine that is being specified. "Lib" tells VB what DLL to look in to find the specified routine. This can be a full path statement, or if the DLL is placed within the Windows search path (like C:\Windows\System) then it is not necessary to include the full path, just the DLL name. The "Alias" key word is OPTIONAL and is only used when the specified routine name is different than the actual name of the routine found within the C style DLL. In this case, you'll notice that there's an underscore ( _ ) before the function name and a "@4" on the end of the function name. The underscore is something that the compiler puts there to differentiate between the actual function name and what's called the "function entry point" within the C DLL. The "@4" tells VB that you need to pass a buffer that is 4 bytes long to the function... this is done by passing the parameter "iErrNum" (Long = 4 bytes).
"HOW DO YOU FIND OUT EXPORTED FUNCTION NAMES" you ask? Simply open the DLL using a little utility that ships with Visual Studio or the Windows SDK called "Dependency Walker" (DEPENDS.EXE) (You can download it here or find out more about it here or here) You'll notice on the top left there's a window showing the inter-dependencies of the DLL you opened, on the bottom there's a break down of each dependency of the DLL, and on the right side of the upper half of the window, there are two windows with columns. The bottom one of the two will list all the exported functions and their information. You'll notice that some functions do not have export names, but do have entry points and ordinal numbers. You can actually access these functions by using their ordinal number, but that's a little too advanced for this lesson.
The key word "ByVal" and "ByRef" ARE EXTREMELY IMPORTANT and are the cause of more than 85% of the errors caused by DLL calls such as this. "ByVal" means that the value contained within the parameter (for example - 4) is to be passed to the function. "ByRef" means that the reference to the value, or the address of the memory that holds the value 4 is to be passed (for example 842147). When you pass a reference, or a memory address of a value (also known as a POINTER), it is possible for the function then to take that memory address and change the value that resides at that address thus allowing the DLL to pass back values to VB.
Imagine if you meant to pass the memory address of the parameter "842147" (which I made up by the way), and instead passed the value "4", Windows would try to access the memory at the address "4", which is a protected memory space thus causing an access violation or memory exception (BLUE SCREEN OF DEATH)!
The one exception to the rule is when you pass STRING values. Because VB uses the OLE sub-system to handle strings as what's called BSTR or B-Strings, you ALWAYS pass string values "ByVal" whether you are passing the value or the reference to the parameter. Also, because most DLL calls expect a "Null Terminated String" to be passed, make sure (when applicable) you add a NULL character to the end of the string being passed like this:
| Private Declare Sub MyFunction Lib "MyDLL.dll" (ByVal MyParameter As String) Dim MyString As String ' You can substitute the VB constant vbNullChar for Chr(0) MyString = "Hello World!" & Chr(0) Call MyFunction(MyString) |
When you take a look inside of the C DLL "SubCls.dll" that is referenced by the VB declaration above, you'll see that it looks like this:
| // Sets the last
error number __declspec(dllexport) __stdcall void SetLastErr (int iErrNum) { LastErrorNum = iErrNum; } |
The "__declspec" key word is one of many ways of telling the C compiler that this is a function. The "dllexport" key word that is passed tells the compiler that this function is to be exported by the DLL. The "__stdcall" key word is a VERY IMPORTANT key word for VB programmers because it is what allows VB applications to make use of these functions. VB can only call exported functions declared with the __stdcall key word. The __stdcall key word tells the compiler that the called function (or the DLL in this case) is the one that pops (or cleans up) the arguments (or parameters) that are passed to the DLL from off of the memory "stack". The default declaration type, and the main alternative to "__stdcall" is "__cdecl". With __cdecl, the calling function (or the application in this case) is the one that cleans up the parameters that are passed to the DLL from off of the memory stack.
C style DLLs do NOT have to be registered like ActiveX DLLs do. They just have to be within the Windows search path, or within the same directory as the application that is using it.
ActiveX / COM / VB Style DLLs:
You probably won't be dealing too much with C style DLLs beyond standard calls to the Win32 API (all Win32 API calls are written in C using the __stdcall calling convention), so this section will probably be more applicable, and therefore more interesting to you.
ActiveX DLLs have advantages and disadvantages over C style DLLs. An advantage is you don't have to create a declare statement for every function call, you just set a reference to the DLL and declare a variable to represent the DLL interface you're interested in... and away you go! On top of that, when you reference an ActiveX DLL like that, you get the bonus of "IntelliSense" within the VB IDE - which means that when you type the name of a variable that you've declared as an interface of the DLL you just referenced, a drop-down list will appear with all the properties and methods of that interface, making it easy to use. I'll explain more on this later.
The disadvantage of ActiveX DLLs over C style DLLs is you have to register them using REGSVR32.EXE like this:
This registers the DLL:
C:\WINDOWS\SYSTEM\REGSVR32.EXE MyDLL.dll
This unregisters the
DLL:
C:\WINDOWS\SYSTEM\REGSVR32.EXE /U MyDLL.dll
However, by registering ActiveX DLLs this way, they can be ANYWHERE on your computer - your are not limited to the Windows search path. The reason for this is the REGSVR32.EXE program puts information in your registry that tells Windows exactly where to find the DLL so it doesn't have to search for it.
When using Visual Basic to create DLLs, you don't have a choice of what kind of DLL you want to create - you can only create ActiveX DLLs. However, you can get software like BCX (BASIC to C Translator) that can take your code and translate it from VB code (well... BASIC, but BASIC is very close to VB, minus the VB objects) and changes it into C. Once your code has been translated to C code, you can use a free C compiler like LCC-Win32 to compile it into a C style DLL. I did this to create the SubCls.DLL that is posted on this site under the "DOWNLOADS - DLL Files" section.
ActiveX DLLs are VERY versatile and are designed to be used within any COM-aware application, and within such environments as ASP, VBScript, C++, etc. This means that you can use your ActiveX DLL within MS Word, MS Excel, MS PowerPoint, MS Access, AutoCAD, or any other application that has a VBA interface. You can use your ActiveX DLL as a server-side object on an IIS server so that you can use it via ASP or server-side VBScript, etc. You can even use ActiveX DLLs in a C++ project (however, C++ uses ActiveX DLLs in a slightly different way than VB based environments.
One last note about ActiveX... OLE is the same as COM is the same as ActiveX. They are 3 terms for the same technology. Here's a quote from my favorite tech author Dan Appleman:
"OLE, short for Object Linking and
Embedding is the old name for ActiveX, a marketing buzzword invented in the days when
Microsoft was more afraid of Netscape than of the Department of Justice. Nowadays,
you are more likely to hear the term COM or COM+ [Component Object Model] describing those
technologies that are part of or implemented by OLE."
- Dan Appleman : "Dan Appleman's
Win32 API Puzzle Book and Tutorial for Visual Basic Programmers"
Now that we've discussed the different types of DLLs, lets get into the details of how to actually program an ActiveX style DLL from within Visual Basic.
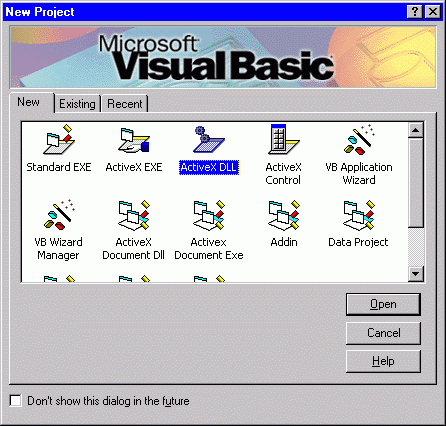
When VB starts up, you'll notice that it shows the following dialog box by default, which prompts you to pick what type of program you're going to be writing (this is a screen shot from Visual Basic 6.0 - Enterprise Edition [SP4] - your screen may differ slightly in appearance):

Select "ActiveX DLL" and click the "Open" button. This will start up VB's IDE and start you off with a default class module named "Class1". You'll notice that there is no default Form provided... nor should there be. The reason for this is DLLs by nature work behind the scenes and therefore there is no end user interface. DLLs are tools for programmers, not interfaces for end users. Of course, if you wanted to you could have your DLL pop up some kind of interface to gather information from the user or something where appropriate, but you can't just double-click on a DLL file and have it run like you can with an EXE file.
So how do you use this DLL? How do you interface with it? That's where the class module (which was handed to you by default) comes in. Within this class module, you create public "Properties", "Methods", and "Events" that you'll later use from your main application, from ASP, or from where ever you'll be using this DLL.
Before we start adding Properties, Methods, and Events to our class module, lets make use of a very handy feature - CLASS EVENTS! Whenever a class is created, a sub routine is called to allow you to initialize default property values, or run calculations. This sub routine can be accessed by clicking on the upper left drop down (object list) and selecting the "Class" object. This will generate the following code for you:
| Private Sub Class_Initialize() End Sub |
Along the same line, when a class is destroyed by setting it to equal NOTHING, a sub routine is called to allow you to free up memory used by the class module, etc. This sub routine can be accessed by clicking on the upper right drop down (event list) and selecting "Terminate" from the list of events for the "Class" object. This will generate the following code for you:
| Private Sub Class_Terminate() End Sub |
Lets go ahead and put a message box in each event to tell us when the events are fired. Do this by putting the following code in each event:
| MsgBox "Class started/ended", vbOKOnly, " " |
Lets start on the DLL elements by adding a few simple properties. The easy way to do this is to have VB put down a prototype of a property and then modify that to what you need. Click the "Tools" menu item and select "Add Procedure..." menu option. This will pop up a simple dialog that asks you for some information to create the property (or function, or sub, or event) from that looks like this:
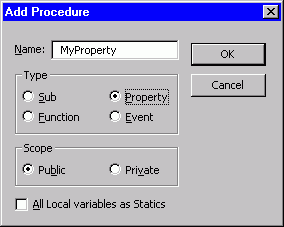
You can use this dialog to create a Sub, Function, Property, or Event prototype. Simply enter the name of the prototype to create, select the prototype you want (in this case PROPERTY), and select the scope (in this case PUBLIC because we want people using our DLL to see this property), and then click OK. That will insert the following code into your class module:
| Option Explicit Public Property Get MyProperty() As Variant Public Property Let MyProperty(ByVal vNewValue As Variant) |
You'll notice that the default data type is "Variant". You'll want to change this to whatever data type is appropriate for your property. In our example here, lets change it to a "String".
The way this works is you've got one procedure that handles the user's request to retrieve the property's value "GET" and one procedure to handle the user's request to change the property's value "LET" or "SET". The SET statement is used for object variable types such as PictureBox, Form, StdPicture, or StdFont. The LET statement is used for all other data types. If you take out the LET statement, it makes this property READ-ONLY to the developer using your DLL. If you take out the GET statement, it makes this property WRITE-ONLY to the developer using your DLL.
Now that we have the routines that are used to return or set the values of this property, we need something to HOLD the property value, because the routines themselves do not hold values. We'll do so by putting the following variable declaration in the "General Declarations" section at the very top of the class module:
| Private p_MyProperty As String |
I declare property variables with a "p_" prefix to denote that they are holding a property value (makes em easier to find too), but you can name it anything you want. Common naming conventions would dictate that you call it "strMyProperty" or "p_strMyProperty" instead to show that it's a string.
MAKE SURE THAT YOU DECLARE THE VARIABLE AS "Private" ! If you declare it as PUBLIC, every instance of this class module will share the same value for this property... which kinda defeats the whole purpose of using the same class module multiple times. Also, make sure that you declare the variable that holds the property's value as the same data type as the property it self - in this case "String".
The next step is to assign the value of the property with the value of the variable like this:
| Option Explicit Private p_MyProperty As String Public Property Get MyProperty() As String Public Property Let MyProperty(ByVal strNewValue As String) |
You can also use the GET and LET routines to run calculations and return a calculated value based on the input value. This is a big advantage to just using a Variable or Type to hold values... you can run code when the user reads or writes a property value.
Lets add another property, but this time, lets pass an additional parameter to it - an Index. You can pass whatever parameters you want to/from properties, but Index makes sense for getting or setting array values. We add the following code to our class module to do this:
| Private p_MyNumbers(5) As Long Public Property Get MyNumbers(ByVal Index
As Integer) As Long Public Property Let MyNumbers(ByVal Index
As Integer, ByVal strNewValue As Long) |
Now you know how to use Properties, lets add a Method! That would be fun, right? "BUT WHAT IS A METHOD" you ask? A "Sub" or a "Function" routine when within a class module is called a "Method". Simple enough, right?
| Public Function Get_2_Plus_2() As Integer Get_2_Plus_2 = 2 + 2 End Function |
Subs and Functions within class modules are treated just the same as within any other part of your project. However, if you declare your Sub or Function PRIVATE, you can only use it within the class module. If you declare it PUBLIC, then you can use it as part of the class object (because classes really are objects) anywhere in your project. If you declare it FRIEND (something you can only do within a class module), then other parts of your project can see it, but once compiled, that method will appear as if it does not exist. It's a way of allowing access to it for you, but restricting it for others. The FRIEND declaration can be used for properties as well as methods.
What have we left out so far? EVENTS! Events are actions that take place to notify the application of the user's activities so it can react appropriately. For example, if you have a Label control placed on a form called "lblURL" that has it's caption set to "http://www.thevbzone.com" and you want the caption to be UNDERLINED as if it were an internet link when the user holds their cursor over it. To do this, you'd use the MouseMove event like this:
| Private Sub lblURL_MouseMove(Button As Integer, Shift As Integer, X As Single, Y As Single) lblURL.FontUnderline = True End Sub Private Sub Form_MouseMove(Button As Integer, Shift As Integer, X As Single, Y As Single) |
To create an event, we open up the "Add Procedure" dialog again by going to the "Tools" > "Add Procedure..." menu option and selecting "Event" as the procedure type. Lets add an Event called "PropertyChanged". When we click OK, the following code is placed in our class module for us:
| Public Event PropertyChanged() |
To activate this event, we use the "RaiseEvent" function along with the name of the event to fire. Lets make this event fire every time the user changes a property value... so we put the following code in the "LET" routine of every property:
| RaiseEvent PropertyChanged |
At this point, we have all the main aspects of a working DLL, we just need to compile it! Lets check it first. To do this, type "ME." somewhere in your class module. You'll notice that when you press the <PERIOD> key, an "IntelliSense" pop up will drop down to show you all of the properties and methods that have been defined. This is what the user will see when they are using your DLL (minus the elements that are declared PRIVATE or FRIEND). It will look something like this:
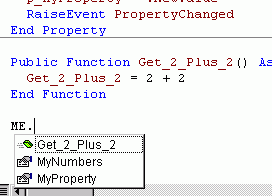
To me, this is one of the BEST features of VB because I know I'm not mis-spelling the properties and methods because I can just select the one I want from the list displayed. I also don't have to memorize what exactly I called the different elements of the class because I can just browse the displayed list of elements until I find the one I want. You'll notice that Functions/Subs/Methods have a little green icon next to them, and properties have a little hand icon next to them. This helps you to quickly distinguish which is which when you're coding.
Another way to check up on your routines is to open the VB Object Browser by selecting the "View" > "Object Browser" menu option, or by pressing the <F2> key. Select the name of your project from the very top left drop down box and you'll notice that all the components of your project are listed in the left window and the elements of each component are listed in the right window. Select the class module we've been working on "Class1" and you'll notice that all of our properties, methods, and events are listed there for us. If you click on one, it will tell you more about it:
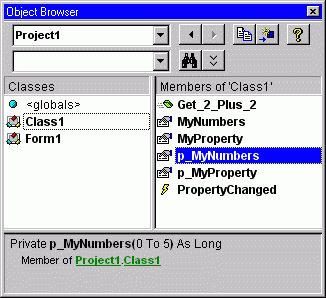
However, at this point none of them have descriptions. Let's remedy that, shall we?! : )
Close the Object Browser and go back to our class "Class1". Select the "Tools" > "Procedure Attributes..." menu option and the following dialog will show up:
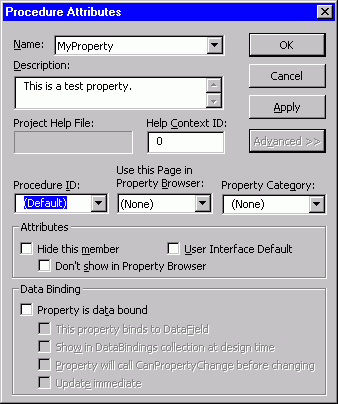
Select which element you want to change from the "Name" drop down,and change the description to whatever you want the user to see when he/she views the details of that Property/Method. You can also make the specified property the DEFAULT property by changing the "Procedure ID" drop down to "(Default)". What this does, is makes is so that if you set a variable equal to your DLL's interface and do not specify a property or method, the default one will be assumed. This is optional, but a good idea. For example, the "Text" property of TextBox controls is the default so you don't have to specify MyTextBox.Text, you can just specify MyTextBox and the Text property is assumed. Same with Label controls, the "Caption" property is the default. You can also set a method to be the "About Box" for your DLL by setting the Procedure ID to "AboutBox". This is more applicable to ActiveX Controls than it is to ActiveX DLLs because setting the Procedure ID of a method of an ActiveX Control allows you to click on the ActiveX Control at design time with in the VB IDE when it's placed on a Form, User Document, etc. and then click the "About" button in the properties window to run that method (which is assumed to show an About window).
There are several other settings here to control the behavior of your ActiveX DLL or Control. Play around with them and find out what they do.
Now that we've setup a description for our properties and methods, go back to the Object Browser by pressing the <F2> button and check out the elements of our class module now:
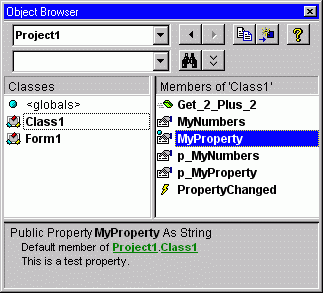
You'll notice that now there's a little blue dot next
to the "MyProperty" property which tells us that that is the DEFAULT property
for this interface. You'll also notice that now there's a description in the bottom
gray area.
Have you noticed that I've been using the terms "class module" and
"interface" interchangeably throughout this lesson? I hope that you have
because it's an important point. You can actually have multiple class modules within
a DLL, thus giving the developer multiple uses from the same DLL. Each class module
you add represents a user interface to your DLL because that's all they will be able to
see from your DLL... the class modules, and the class modules' public elements.
Form1 shows up here because we are still developing the DLL, but you'll see a difference
when you go and compile it and try to use it within another project.
At this point, we're ready to go ahead and compile our DLL project. Lets go ahead and give our only interface a little better name. Click on the "Class1" class module in the "Project" window of VB's IDE and change it's name in the "Properties" window to something like "MyInterface". Also, lets change the name of the DLL project to something like "MyDLL" by clicking on "Project1" in the "Project" window and changing it's name in the "Properties" window.
Next, select the "File" > "Make MyDLL.dll" menu option. This will pop up a dialog asking you where you want to compile the DLL to. DON'T COMPILE IT JUST YET! If you'll remember what I discussed at the end of Lesson 1, you need to set the DLL file's attributes by clicking on the "Options" button on this dialog. Make sure to set the appropriate version number, file title, comments, copyright, etc. under the "Make" tab.
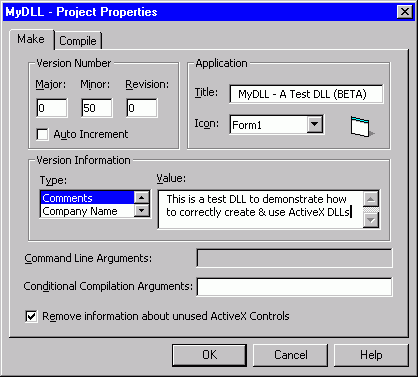
Click the OK button, and then click the next OK button as well to start compiling your DLL.
WE'RE DONE !! - PSYCH ! ;P
Now that you have compiled the DLL, you need to do a few things. First off, when VB compiles an ActiveX DLL like we just did, it automatically registers it in your Windows Registry. If you open up the "Windows Registry Editor" by going to the "START" > "Run" menu option of your system try and type REGEDIT.EXE, you will start up a very handy tool that we can use to see what's going on in the registry. Go to the "HKEY_CLASSES_ROOT" section and browse down until you see "MyDLL.MyInterface". This is the registry entry for our DLL and the one interface that we defined. Each interface you create will have it's own registry entry here. You'll notice that under this registry entry, there's a key named "CLSID" (which stands for Class ID). If you select it you'll notice that there's a HUGE number set for the value of this key. That is the number that represents our DLL's interface GUID (which stands for Graphical User Interface iDentification number) or UUID (which stands for Universally Unique IDentification number). This is a number that is generated by Visual Basic and guaranteed to be unique, and identifies your DLL's interface. This prevents problems that could pop up if more than one person created a DLL called "MyDLL" with an interface called "MyInterface" because the GUID numbers would be different.

If you go up to the CLSID key of the HKEY_CLASSES_ROOT section, you'll see a HUGE list of GUIDs / UUIDs. Find the one that represents our DLL and find the "InprocServer32" sub-key under it. You'll notice that it tells us where the physical DLL is located here:
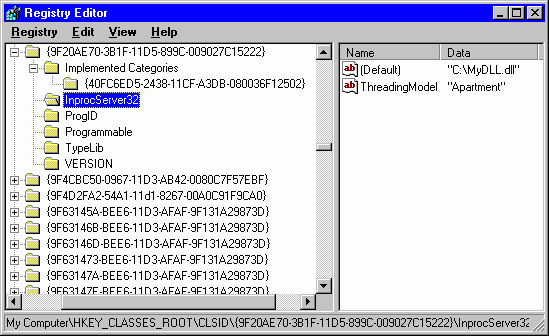
This process that we just went through is what Windows goes through to find the physical file each time you reference an ActiveX DLL or Control interface.
If you'd like to move the DLL from it's current location, you have to do the following:
1) UNREGISTER the DLL by going to a command prompt
and typing the following:
C:\WINDOWS\SYSTEM\REGSVR32.EXE
/U C:\MyDLL.dll
This removes all entries in the Windows Registry that
refer to our DLL.
2) Physically move the DLL to wherever you'd like to to reside (like C:\WINDOWS\SYSTEM)
3) RE-REGISTER the DLL by going to a command prompt
and typing the following:
C:\WINDOWS\SYSTEM\REGSVR32.EXE
C:\MyDLL.dll
USING YOUR DLL WITHIN OTHER PROJECTS:
Now we are ready to go ahead and use our DLL within another application. Lets go ahead and start up a standard EXE project as described in lesson 1 to test our DLL. Once we've started a new project, we need to REFERENCE our DLL. To do so, select the "Project" > "References..." menu option. This will display the References dialog. Once in this dialog, locate our DLL by clicking the "Browse" button and physically locating it, or by looking for it in the list of available references. Once we have references our DLL, to use it we need to create a variable to represent our DLL interface. To do so, declare a variable like this:
| Private TEST As MyDLL.MyInterface |
Once we have created a variable to represent our interface, we need to initialize it by calling the following code:
| Set TEST = New MyDLL.MyInterface |
Once it has been initialized, we can use it. If you type variable name and press the <PERIOD> key, you'll notice an IntelliSense pop up similar to the one we saw when developing the DLL. However when we press the <F2> key as we did before, and select "MyDLL" as the project, we only see the class module "MyInterface" in the listed classes section. This is because, as I stated earlier, classes are the only exposed interfaces to DLLs. When we click on the "MyInterface" class, we see it's PUBLIC elements listed on the right along with their descriptions:
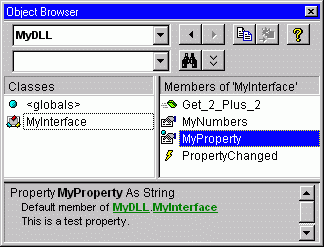
You can now call the "Get_2_Plus_2" method via the TEST variable, or get the values of the properties by specifying them. However, did we leave out the "PropertyChanged" event? "HOW DO I GAIN ACCESS TO EVENTS I'VE DECLARED" you ask? You actually have to change the variable declare statement to tell VB that you are interested in making use of any events available within this interface. To do so, declare the variable TEST like this:
| Private WithEvents TEST As MyDLL.MyInterface |
The "WithEvents" key word makes the "TEST" object available to you in the upper left drop down (object list). Select it from the drop down and VB puts generates the following code for you:
| Private Sub TEST_PropertyChanged() End Sub |
Because "PropertyChanged" is the only event declared for this DLL, it's the only one listed in the upper right drop down (event list). Let's go ahead and put a message box here to tell us when this event fires. So when we put it all together, it looks like this:
| Option Explicit Private WithEvents TEST As MyDLL.MyInterface Private Sub Form_Load() Private Sub Form_Unload(Cancel As Integer) Private Sub Form_Click() Private Sub TEST_PropertyChanged() |
When you run this program, you'll see a message box when the program starts telling you that the DLL interface was initialized. Then when you click on the form, you'll see a message box fired by the "TEST_PropertyChanged" event that lets you know the property changed in the "Form_Click" event. Then when you close the form, you'll see one last message box telling you that the DLL interface was terminated.
You can also use ActiveX DLLs in Windows Script files by putting the following in a text file named "TEST.vbs":
| On Error Resume Next Dim TEST 'As MyDLL.MyInterface Set TEST = WScript.CreateObject("MyDLL.MyInterface") TEST.MyNumbers(1) = TEST.Get_2_Plus_2 Set TEST = Nothing |
You can also use ActiveX DLLs in ASP/VBScript by registering it on an IIS Web Server and calling it from a web page like this:
| <SCRIPT LANGUAGE="VBScript"
RUNAT="SERVER"> On Error Resume Next Dim TEST 'As MyDLL.MyInterface Set TEST = SERVER.CreateObject("MyDLL.MyInterface") TEST.MyNumbers(1) = TEST.Get_2_Plus_2 Set TEST = Nothing </SCRIPT> |
THAT'S IT !! Congratulations, you're now an expert on DLLs... er... well at least you know enough about them to use them correctly. =) HAVE FUN !
MAIN | DOWNLOADS | SAMPLE CODE | STEP BY STEP | DISCUSSION BOARD | LINKS | AUTHOR
E-MAIL
![]()